1. Introduction: The Remote Access Trust Challenge
Remote access is a critical part of modern enterprise infrastructure, but many organizations still face common SSL VPN issues such as browser certificate warnings or FortiClient connections failing at 98% (connSize=0 or SSL_accept failed).
In most cases, the problem is not caused by routing, firewall policies, or Active Directory authentication. The real issue is usually an improperly configured or untrusted PKI (Public Key Infrastructure).
Older environments relied on the certificate Common Name (CN) for identity verification. Modern browsers, operating systems, and FortiClient versions now require the use of Subject Alternative Name (SAN) entries instead. If the SAN does not match the VPN FQDN or IP address, the TLS handshake will fail.
When a client connects to the FortiGate SSL VPN, two validation checks occur:
- The client must trust the Certificate Authority (CA) that signed the VPN certificate.
- The VPN hostname or IP address must match the certificate SAN entry.
If either validation fails, the connection is blocked or silently dropped to protect against potential Man-in-the-Middle (MitM) attacks.
In this guide, we will build a fully trusted FortiGate SSL VPN environment using Windows AD CS, SAN-enabled certificates, and Group Policy trust distribution.
The process includes creating a custom certificate template, generating a CSR on the FortiGate, signing the certificate through AD CS, and automatically distributing trust across domain-joined endpoints using GPOs.
2. Architectural Blueprint & Trust Lifecycle
To build a trusted remote access infrastructure, we must align three key systems: the Enterprise Certification Authority, the Active Directory Domain Services (AD DS) directory, and the FortiGate NGFW.
Environment Reference Used in This Guide
OfficeLab.local→ Internal Active Directory domain10.0.0.4(Lab.OfficeLab.local) → Domain Controller and AD CS Servervpn.OfficeLab.local(100.1.1.2) → FortiGate SSL VPN Gateway10443/TCP→ SSL VPN listening port
3. Phase 1: Preparing the SAN-Ready Certificate Template on AD CS
By default, the standard "Web Server" template in Active Directory Certificate Services does not allow you to export the private key once signed, nor does it allow requesting custom SAN attributes. We must duplicate and configure a custom template.
Step 3.1: Duplicate the Web Server Template
- Log in to your Windows CA Server (
10.0.0.4) and open the Certification Authority console (certsrv.msc). - In the left pane, right-click Certificate Templates and select Manage to launch the Certificate Templates Console.
- Locate the Web Server template in the middle pane, right-click it, and select Duplicate Template.
Step 3.2: Configure Template Parameters
In the duplicate template's properties window, configure the following critical tabs:
- Compatibility Tab:
- Certification Authority: Windows Server 2012 R2 or later.
- Certificate Recipient: Windows 8.1 / Windows Server 2012 R2 or later.
- General Tab:
- Template Display Name:
Enterprise Web Server (Exportable) - Template Name:
EnterpriseWebServerExportable - Adjust validity periods based on your security policies (e.g., 2 years).
- Template Display Name:
- Request Handling Tab:
- Check the box:
Allow private key to be exported. (This is critical: without this, the private key cannot be moved to non-Windows appliances like FortiGate if generating keys server-side).
- Check the box:
- Subject Name Tab:
- Select
Supply in the request. (This allows the FortiGate CSR to specify its own Common Name and SAN domains dynamically).
- Select
- Security Tab:
- Ensure the user or service account enrolling the certificate has Enroll and Read permissions.
Step 3.3: Publish the Template
- Go back to the Certification Authority console (
certsrv.msc). - Right-click Certificate Templates (in the left pane) $\rightarrow$ New $\rightarrow$ Certificate Template to Issue.
- Select
Enterprise Web Server (Exportable)from the list and click OK.
4. Phase 2: Generating the CSR on FortiGate
The private key is generated internally on the FortiGate and never leaves the hardware. We export only the public portion in a Certificate Signing Request (CSR).
Step 4.1: Enable the Certificates Feature
Before generating a CSR, ensure the certificates feature is active on your FortiGate GUI.
- Navigate to System → Feature Visibility.
- Toggle
Certificatesto active and click Apply.
Step 4.2: Generate the CSR via FortiOS CLI (Recommended for SANs)
While the GUI allows creating standard requests, the most robust way to ensure exact SAN attributes (both DNS hostnames and WAN IP addresses) is by using the FortiOS CLI:
config vpn certificate local
    edit "SSL_VPN_Cert_CSR"
        set comments "SSL VPN Certificate with Subject Alternative Names"
        set common-name "vpn.OfficeLab.local"
        # DNS and IP SAN entries must match your connection strings exactly
        set subject-alternative-name "DNS:vpn.OfficeLab.local,DNS:vpn-backup.OfficeLab.local,IP:100.1.1.2"
        set key-size 2048
        set key-type rsa
        set enrollment-protocol none
    next
end
Step 4.3: Export the CSR from FortiGate
- Navigate to the FortiGate GUI $\rightarrow$ System → Certificates.
- Locate the newly created certificate object named
SSL_VPN_Cert_CSR(it will display a status of Pending). - Select the object and click Download to save the
.csrfile to your administrator workstation.
5. Phase 3: Submitting and Signing the CSR on the AD CS CA
Once the CSR is exported, submit it to your Enterprise CA to be signed against our custom template.
Step 5.1: Install IIS Web Enrollment (If Missing)
The Microsoft Web Enrollment portal provides a clean browser-based interface to submit base-64 encoded CSRs. If it is not installed yet on your AD Server:
- Open Server Manager $\rightarrow$ Manage $\rightarrow$ Add Roles and Features.
- Step through the wizard to Server Roles.
- Under Active Directory Certificate Services, check
Certification Authority Web Enrollment. Click Add Features on the popup. - Complete the installation and click the yellow notification flag in Server Manager to run the AD CS configuration tool.
Step 5.2: Submit the CSR to the Web Enrollment Portal
- Open a browser on a management machine and go to:
http://10.0.0.4/certsrv(orhttp://localhost/certsrvdirectly on the server). - Click Request a certificate $\rightarrow$ advanced certificate request.
- Open your exported
SSL_VPN_Cert_CSR.csrfile in a text editor (like Notepad). - Copy the entire block of text (including the
-----BEGIN CERTIFICATE REQUEST-----and-----END CERTIFICATE REQUEST-----delimiters). - Paste the text into the Saved Request text area in your browser.
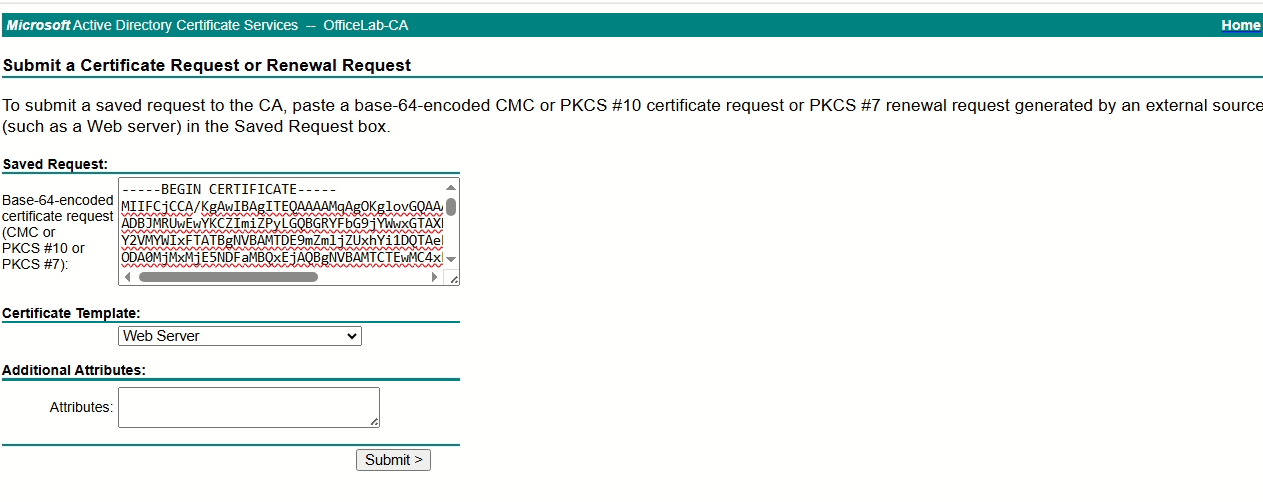
- In the Certificate Template dropdown, select
Enterprise Web Server (Exportable)(the custom template published in Step 3.3). - Click Submit.
Step 5.3: Download the Signed Base-64 Certificate
- On the "Certificate Issued" page, select Base 64 encoded.
- Click Download certificate and save the file as
SSL_VPN_Signed_Cert.certo your workstation. - Download the root CA certificate from the main page of
/certsrvasOfficeLab-CA-ROOT.certo distribute trust.
[!WARNING] If Web Enrollment displays a "Forbidden" or "401 Unauthorized" error when submitting the CSR, ensure you are running the browser as Administrator, or add
http://localhost(or the CA IP) to your browser's Trusted Sites zone under Internet Options.
6. Phase 4: Automating Endpoint Trust via Active Directory GPO
Before importing the signed certificate into the firewall, we must make sure all domain computers trust our Enterprise CA automatically.
Step 6.1: Open the Group Policy Editor
- Log in to your Domain Controller.
- Open the Group Policy Management Console (
gpmc.msc). - Expand Forest → Domains → OfficeLab.local.
- Right-click your target GPO (e.g.,
GP-PKI-Trust-Distributionor your Default Domain Policy) and select Edit.
Step 6.2: Import the Root Certificate into Trusted Root Authorities
- In the Group Policy Management Editor, navigate to:
Computer Configuration → Policies → Windows Settings → Security Settings → Public Key Policies. - Right-click Trusted Root Certification Authorities and select Import.
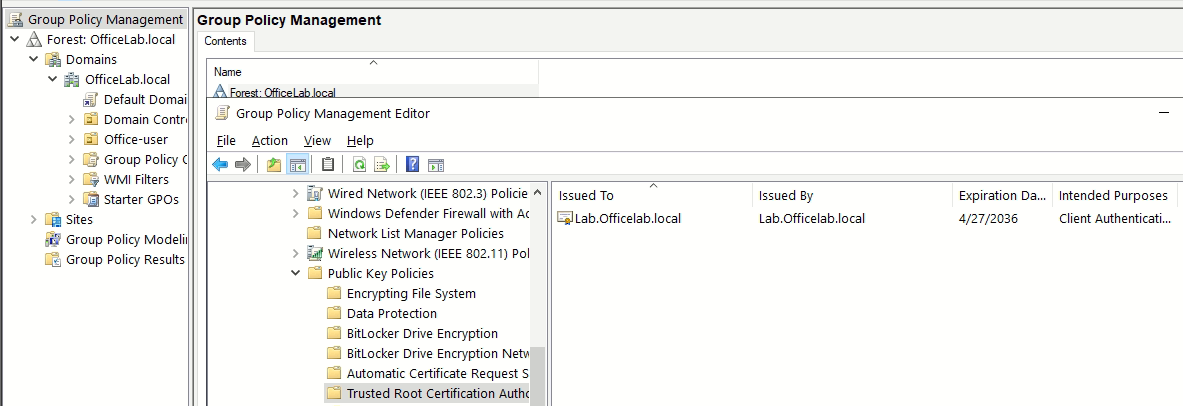
- Work through the Certificate Import Wizard, browse and select your
OfficeLab-CA-ROOT.cerfile, and select the store Trusted Root Certification Authorities. - Click Finish. Run
gpupdate /forceon your domain workstations to force an immediate refresh. Every computer in the domain will now automatically trust certificates signed byOfficeLab-CA.
7. Phase 5: Implementing the Certificate on FortiGate
Now, we import the signed certificate back to the FortiGate to pair it with the local private key, and set it as the SSL VPN server certificate.
Step 7.1: Import the Local Certificate
- On the FortiGate GUI, navigate to System → Certificates.
- Click Create/Import in the top toolbar.
- For FortiOS 7.0.x / 7.2.x: Select Certificate → Import Certificate → Local Certificate.
- For FortiOS 7.4.x+: Select Local Certificate.
- Under Type, choose Certificate.
- Upload
SSL_VPN_Signed_Cert.cerand click OK. - The status of your original pending CSR object will instantly change to
OK (Validated).
Step 7.2: Apply the Certificate to the SSL VPN Service
Update the SSL VPN settings to present the newly signed certificate to incoming clients:
config vpn ssl settings
    # Bind the trusted local certificate
    set servercert "SSL_VPN_Cert_CSR"
    # Ensure secure TLS parameters are enforced
    set ssl-max-proto-ver tls1-2
    set ssl-min-proto-ver tls1-2
end
[!NOTE] Lab Quick-Fix (PowerShell Certificate Import): If you generated a
.pfxcertificate using the PowerShell Method (Method 2), you must import the certificate using the PKCS #12 type on the FortiGate, providing the password (FortiGate123!) you set during export. Standard "Certificate" import types will reject PFX files.
8. Verification & Diagnostics Playbook
With the GPO pushed and the FortiGate configured, perform the following validation steps.
Step 8.1: Verify Browser Trust and SAN Fields
- From a domain-joined client machine, open a browser and navigate to the SSL VPN portal:
https://vpn.OfficeLab.local:10443. - Inspect the lock icon in the address bar. It should show a secure padlock indicating a valid connection.
- Open the certificate details and verify that the Subject Alternative Name (SAN) matches the FQDN and IP address:
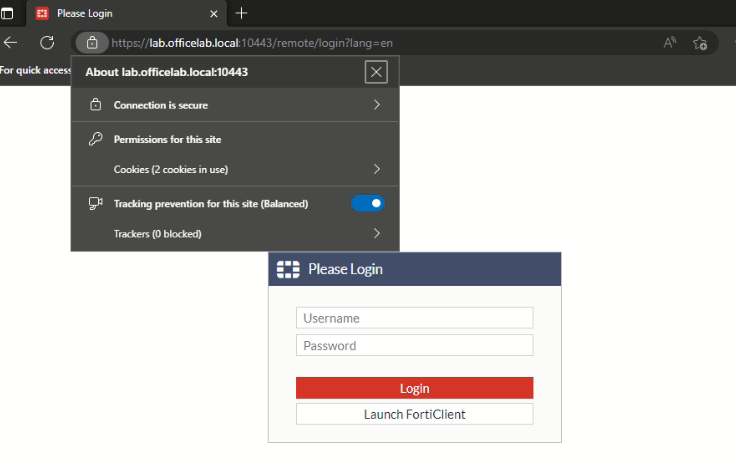
Step 8.2: Configure the FortiClient Profile
- Open the FortiClient Console on the client PC.
- Select Configure VPN and configure the SSL-VPN profile:
- Connection Name:
OfficeLab Corporate VPN - Remote Gateway:
vpn.OfficeLab.local(You must use the FQDN in the certificate SAN, not the IP address). - Port:
10443
- Connection Name:
- Click Connect, enter your domain credentials, and establish the tunnel. The connection will complete without prompting any certificate warnings or dropping.
9. Recommendations
To maintain a secure, zero-outage remote access environment, implement the following operational practices:
- Monitor Expiration Dates: Set automated alerts in your monitoring stack (e.g., Zabbix, PRTG, or FortiManager) to notify your security team 60 days before the SSL VPN certificate expires.
- Implement Graceful Cutover: When renewing the certificate, import the new certificate under a distinct name (e.g.,
SSL_VPN_Cert_2026). Bind the new certificate underconfig vpn ssl settingsduring off-peak hours. - Automate Root CA Distribution: Always use Active Directory GPOs to push internal CAs. If a new CA is introduced (e.g., migrating to a two-tier PKI model), distribute the new Intermediate/Root CA trust via GPO at least 30 days before deploying the new SSL VPN gateway certificate to prevent user connectivity drops.